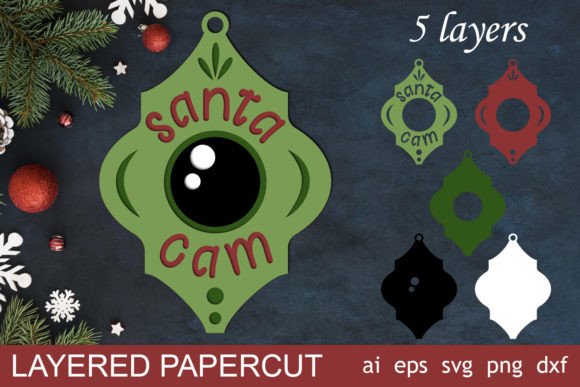
Santa Cam Ornament, Christmas 3d Layered: A Comprehensive Guide to Creating Stunning Holiday Decor
The holiday season is a time for creativity, warmth, and sharing personal touches with friends and family. One of the most popular ways to express this spirit is through handmade ornaments. Among the myriad of designs available, the Santa Cam Ornament, Christmas 3d Layered has emerged as a favorite among crafters, DIY enthusiasts, and professional makers alike. This design offers a unique blend of nostalgia and modern crafting technology, allowing you to create a festive decoration that stands out on any tree or mantel.
If you are looking to elevate your holiday crafting game, understanding how to utilize this specific template effectively is key. Whether you prefer cutting by hand or leveraging advanced machinery, this guide will walk you through everything you need to know about the Santa Cam Ornament, Christmas 3d Layered project, from file preparation to final assembly.
Understanding the Santa Cam Design Concept
At its core, the Santa Cam Ornament, Christmas 3d Layered is not just a flat sticker; it is a multi-dimensional piece of art. The "3D layered" aspect refers to the technique of stacking multiple cut pieces of material—such as cardstock, felt, wood, or acrylic—to create depth and shadow. This effect brings the image of Santa Claus taking a photo (the "Santa Cam") to life, giving it a dynamic presence that flat designs simply cannot match.
This design appeals to adults who appreciate both the aesthetic charm of traditional Christmas imagery and the satisfaction of building something tangible. The goal is to produce an ornament that feels substantial and high-quality, serving as a memorable keepsake or a thoughtful gift. By using layered techniques, you can control the visual focus, ensuring that Santa’s face and camera equipment pop against the background layers.
Technical Specifications and File Compatibility
One of the greatest advantages of digital crafting templates is their versatility. When you acquire the Santa Cam Ornament, Christmas 3d Layered, you are not limited to a single method of production. The package is designed to be compatible with a wide range of tools and software, ensuring that whether you are a beginner or a seasoned pro, you have the resources needed to succeed.
What You Will Receive:
- 1 AI File: Containing all layers grouped together, ideal for Adobe Illustrator users who want full editing capabilities.
- 1 EPS File: A robust vector format suitable for various design programs, preserving all layer structures.
- 1 SVG File: With all layers intact, perfect for web-based editors and general vector manipulation.
- 5 Separate SVG Files: Each layer separated into its own file, making it easier to manage colors and materials individually.
- 5 DXF Files: Separated layers specifically optimized for CNC machines and laser cutters.
- 5 PNG Files: High-resolution images with transparent backgrounds, useful for printing or manual tracing.
All files are sized at 8x8 inches, providing a generous canvas for detail work. Crucially, all vector files are fully editable. This means you can change colors to match your home decor, resize elements if you wish to create a larger display version, and adjust spacing between layers to alter the depth of the 3D effect.
Important Note: Before purchasing or downloading, please ensure your software and cutting machine accept AI, SVG, DXF, EPS, and PNG formats. Compatibility varies by device, so verifying your system requirements prior to use is a critical step in avoiding frustration.
Choosing Your Cutting Method
The beauty of the Santa Cam Ornament, Christmas 3d Layered lies in its adaptability. You can approach this project in two distinct ways: manual cutting or machine cutting. Both methods yield excellent results but require different preparations.
Hand Cutting
If you enjoy the tactile experience of crafting, cutting by hand is a rewarding option. Using the provided PNG or SVG files as a guide, you can trace the shapes onto your chosen material. Cardstock is a popular choice for hand-cutting because it holds its shape well and is easy to score and fold. Felt is another excellent material, offering a soft, cozy texture that fits the Christmas theme perfectly. For hand cutting, precision scissors or a craft knife are essential. Take your time with intricate details, such as the buttons on Santa’s coat or the lens of the camera.
Machine Cutting
For those who value speed and consistency, ready-to-cut files for machines like Cricut, Silhouette, Brother ScanNCut, Glowforge, and other CNC lasers are included. The separate DXF and SVG files allow you to load each layer directly into your cutting software. This method ensures that every cut is precise, which is vital for the 3D layered effect. If the edges do not align perfectly due to imprecise cuts, the illusion of depth may be compromised.
When using a machine, consider the material thickness. Heavier materials like basswood or thick chipboard may require multiple passes or higher blade pressure. Always perform a test cut on a small scrap piece to calibrate your machine settings before committing to your final ornament materials.
Assembly and Practical Applications
Once your layers are cut, the assembly process begins. This is where the magic happens. The Santa Cam Ornament, Christmas 3d Layered relies on the strategic gluing of layers to create dimension. Start with the largest background layer and work your way inward to the smallest, most detailed pieces.
Tips for Successful Assembly:
- Use the Right Adhesive: For paper and cardstock, a strong glue stick or double-sided tape works well. For heavier materials like wood or foam board, consider a hot glue gun or epoxy for a secure bond.
- Align Carefully: Use pins or tweezers to hold layers in place while the adhesive sets. Misalignment can ruin the 3D perspective.
- Add Texture: Consider adding glitter, metallic paint, or ribbon accents to enhance the visual appeal. The transparent background in the PNG files allows you to easily overlay these effects digitally before printing, or apply them physically after cutting.
This ornament is versatile enough for various applications. It serves as a beautiful standalone decoration, but it can also be adapted into a wreath centerpiece, a table runner accent, or even a framed wall art piece. The ability to edit colors means you can customize the palette to match specific themes, such as a rustic brown and green scheme or a classic red and white holiday look.
Why Choose This Template?
Selecting the right template can make or break your crafting experience. The Santa Cam Ornament, Christmas 3d Layered is designed with the user in mind. It provides a structured yet flexible framework that accommodates different skill levels. For beginners, the separated layers simplify the organization process, reducing the cognitive load of figuring out which part goes where. For advanced users, the editable vector files offer endless opportunities for customization and experimentation.
Furthermore, the inclusion of multiple file formats ensures longevity. As technology evolves, having access to AI, EPS, and SVG files means your investment remains useful regardless of future software updates. The transparent background feature in the PNG files also adds value, allowing for seamless integration into digital projects or print-on-demand services if you decide to share your creations online.
Conclusion
Crafting the Santa Cam Ornament, Christmas 3d Layered is more than just a holiday activity; it is a creative outlet that yields a tangible, beautiful result. By leveraging the comprehensive file package provided—including AI, EPS, SVG, DXF, and PNG formats—you can choose the cutting method that best suits your style and resources. Whether you are cutting by hand with a craft knife or programming a Glowforge, the end result will be a stunning 3D ornament that captures the joy of the season. Thank you for considering this template for your holiday projects, and happy crafting!